FreeCAD and 3D Printing
After spending time 3D modelling my L1 certification rocket in Solidworks using my university rocketry team's subscription, I started getting into modelling other things for use in various projects around the team. The university had recently invested in a large 3D print farm using Prusa XL's, which design teams were able to book out and use for weeks at a time. I had quite a bit of fun modelling several different things:
- A screw switch cover to prevent the screw from backing out when disarming
- A bottle cap for a Raptor CO2 canister so it could be used as a flask
- Desk and drawer organizers for the constantly messy workspaces (succeeded in cleaning up a good bit of it)
Fortunately (and unfortunately), this is my graduating year. I won't have access to the team's Solidworks subscription forever, and I wanted to use a CAD program that would run on my Linux desktop and my Windows laptop. Solidworks was very slow and clunky to load and consumed a ton of system resources, so something lighter weight but with the same or similar capabilities (parametric CAD is enough for a beginner like me, no fancy simulations necessary yet) was my goal.
Using FreeCAD
It was at this time I found FreeCAD while searching for free CAD programs that could run on Linux. There were a lot of negative reviews of the older versions of FreeCAD calling it unusable from what I was able to find, but a more recent version 1.0 was generating a lot of positive buzz. I decided to give it a try for myself and was quite amazed overall.
FreeCAD's part workbench operated in essentially the same way that I was used to from Solidworks: make a sketch, constrain it, then perform 3D operations on the sketch to make parts (extrude, cut, add holes, mirror, etc.). It didn't take very long to get used to that part of the workflow. Then I tried out the assembly workbench, which was different enough from Solidworks for mating parts that it took some getting used to, but was still relatively easy to understand with the help of the documentation.
To me, there are two very exciting features of FreeCAD that make it powerful. The first is the Python API, which allows you to script macros and small programs that modify your CAD models. It makes the program incredibly extensible. You're able to modify all the keybinds to your liking as well, and change the navigation modes to match whatever you're used to (TinkerCAD, OpenSCAD, Blender, etc.).
The second amazing feature (allowed by the Python API and the fact that FreeCAD is open source) is the add-on manager. FreeCAD allows community members to create their own add-ons that add features or modify FreeCAD behaviour. One of my personal favourites is the fasteners workbench . It allows you to add any kind of standard fastener to your model and assemblies, and the fasteners are parametric about standard parameters. You can choose a metric socket head screw, then decide if it's M3, M4, M5, etc. and even change its length to whatever size your model requires. What's especially nice is being able to toggle on and off the rendering of threads, which can really speed up FreeCAD on models that don't need threads explicitly included. This is a huge benefit compared to my workflow in Solidworks, which was to download the Solidworks model of a fastener from the McMaster Carr and add it to my model. With FreeCAD it's much easier and the models already come parametric, so you can link the length of a fastener to some parameter of your main design, or turn of the thread rendering easily.
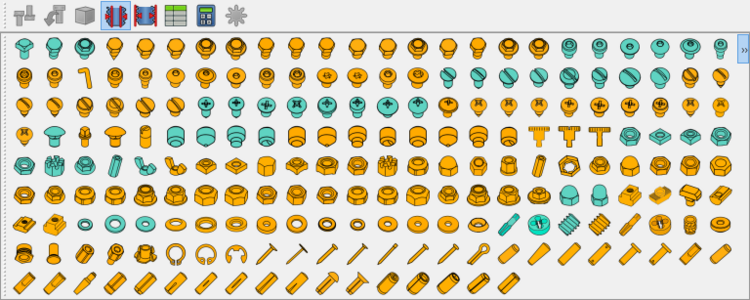
The many fastener options available in the fastener workbench.
The extendability of FreeCAD through scripting and add-ons is incredibly adjacent to the Lua + plugin ecosystem of Neovim. Those features are major selling points of Neovim as a text editor, and it's exactly the same for a 3D modelling program that engineers spend lots of time modelling in every day.
3D Printing
Since I had so much fun printing designs on my university's 3D printers, I decided I wanted to get one of my own to learn more about them and to print my own designs. This way I could turn the models I made using FreeCAD into reality and build my own useful projects.
After doing some research about 3D printers, I learned quite a bit about the different manufacturers. I really like the Prusa printers because of their high quality, great support system and open-source ecosystem. However, they were wildly more expensive than other alternatives. I didn't want to overspend on my very first 3D printer. I spoke with some other students I knew who had 3D printers and decided on the Creality Ender 3 V3 KE.
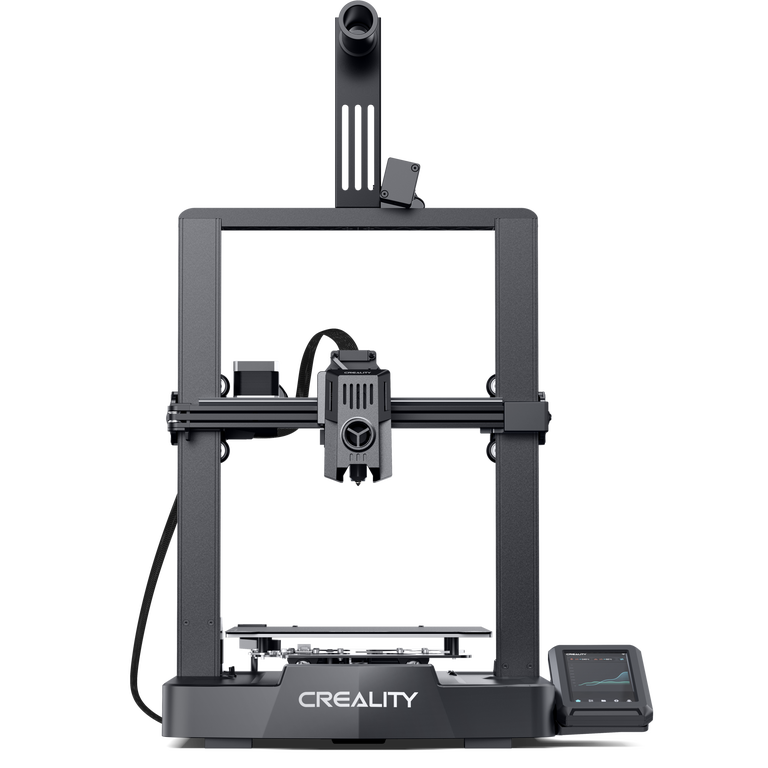
The Creality Ender 3 V3 KE
This is a cheap printer which is generally regarded as a good entry printer. It requires some maintenance and can be modded, which would help me learn more about 3D printers in general. In comparison to the older Ender 3 models, the KE has automatic bed levelling and is said to be less finicky. I decided that was a good selling feature for me. It's also capable of printing ABS, although without an enclosure I heard it may be difficult to achieve good prints. For now I've only been printing with PLA.
Thus far, I've had an excellent time making storage bins that are Gridfinity compatible. I've cleaned out a ton of my junk drawers and given everything a proper, unique home so that it gets put away where it should go. It's also been very convenient for changing how things are organized within drawers; I can easily move what I've been using more often to the front of the drawer, and then to the back again when it becomes less used.
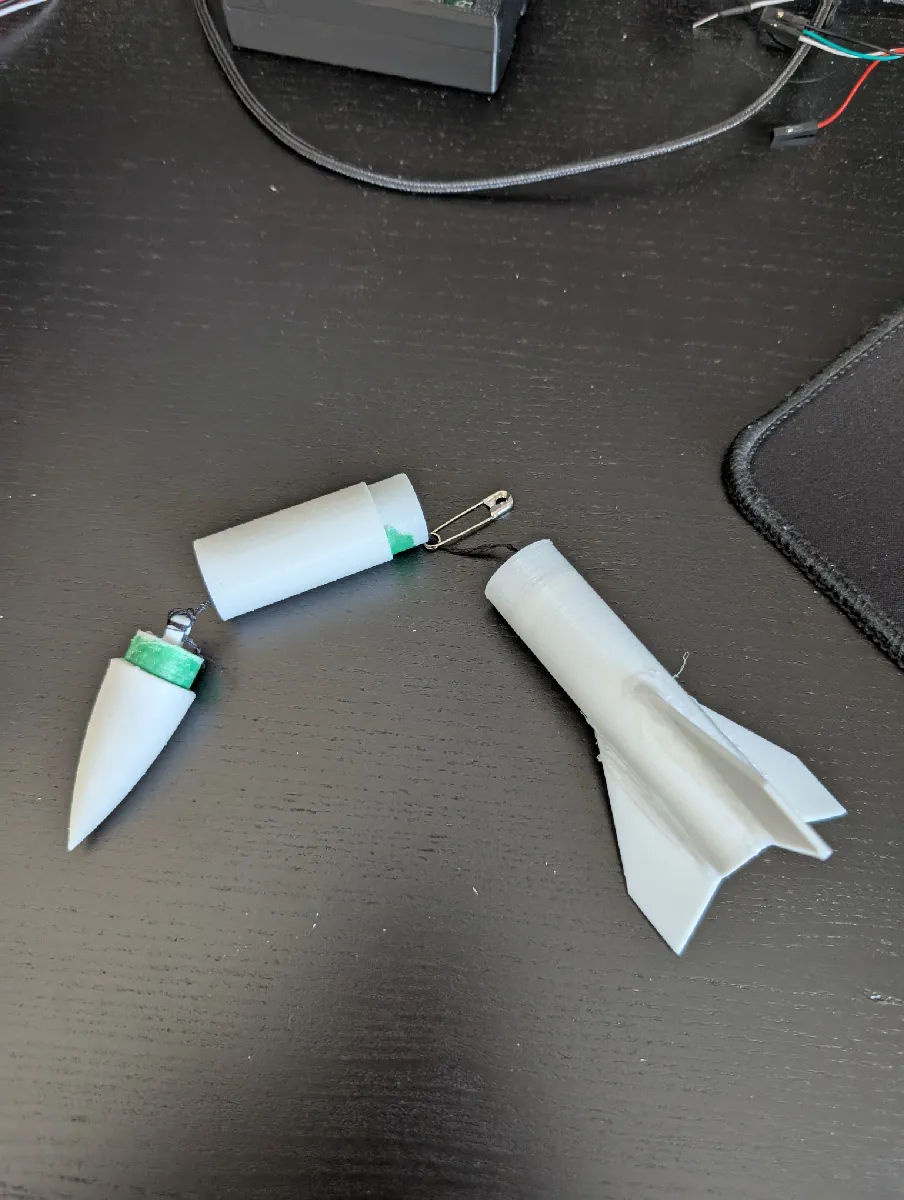
I even made a small model rocket for flying B-class motors! It has a full recovery system and didn't take hardly any filament or time to print. I posted all my models on Printables so that other people are able to print and use them as well. I posted them along with the FreeCAD files in case any other makers want to tweak the settings or modify an original CAD file.
I really cannot recommend 3D printing enough to anybody. I am computer systems engineer by formal education, and did not touch any 3D design or modelling since my first year of undergrad. It was only recently after having to model my own rocket that I realized how powerful and how fun it could be, especially coupled with a relatively cheap 3D printer to actually make the models into something physical and useful.
Now that I have access to my own 3D printer and FreeCAD, I hope to break out of the domain I've been working in for most of my undergrad: software and electrical design. Now I can design mechatronics for my software and circuits to control, and turn them into a reality in a few hours of print time. This is a huge leap forward in becoming a "well-rounded engineer" compared to how I had stuck to software and electrical design for so long. I'm very excited to learn more about designing mechanical systems and actually build some useful things!